
How to build ACF custom blocks in WordPress
I‘ve spent the past few weeks learning how to build a WordPress Hybrid theme. I‘ve been using the good old Classic editor for ages and while the new Gutenberg editor never really clicked for me, I thought it was about time to at least give it a try and learn more about it.
So, after learning the basics for how to start a WordPress Hybrid theme from scratch (which I will go over in another article), I thought it might be a great idea to share what I‘ve learned on the topic and how I build the blocks for my projects.
Let me preface this by saying that I‘ve used the paid plugin ACF Pro, simply because this seemed the most straightforward and clean way to me – after doing lots of research.
However, I might be covering how to build blocks without ACF Pro in yet another article.
Alright then. In this article, I want to give you a basic idea of how you can build custom blocks with ACF on the example of a simple (hero) block.
Folder structure
For simplicity’s sake, I’m gonna suggest the following folder structure to get you going (that’s what I do in my projects):
/your-theme
│
└─── /blocks
│   │
│   └─── /hero
│       │   block.json
│       │   render.php
│       │   style.css
Inside block.json we can now add a very basic configuration for the block we’re creating:
{
  "name": "acf/hero",
  "title": "Hero",
  "description": "Displays a simple hero section",
  "category": "layout",
  "icon": "carrot",
  "apiVersion": 2,
  "acf": {
      "mode": "preview",
      "renderTemplate": "render.php"
  },
  "supports": {
    "anchor": true
  },
  "style": ["file:./style.css"] // Optional if you're using Tailwind CSS
}
Here’s a quick overview of what each of the parameters we defined does:
- name: You can define a custom prefix for your block names. I used
acfin the example above, which would be added automatically if you don’t add one. - title: Pretty self-explanatory (though, properly naming things is no simple task as all developers know).
- description: Add a description for your block, which will be shown in the WordPress back-end.
- category: Whatever category you think your block fits best into.
- icon: You can either pick a Dashicon icon to use or include your own SVG icon
- acf: That’s where we add our ACF specific settings.
- supports: That’s where we add some Gutenberg features our block supports. For now I suggest you just go with the parameters I’ve provided, as I’ll touch on that another time.
- style: Let’s you specify a stylesheet to include with this block. I personally use Tailwind CSS with it’s utility first approach, which is why I marked the line as optional above. But you can go ahead and add it if you’re using another framework or writing your own styles.
If you want to learn more about these I suggest checking out the official WordPress guide.
Register your blocks
Now in order for ACF to “recognize” our blocks, we need to tell our theme to load the blocks we create inside the above folder structure.
Go ahead and add add the following function to load all blocks inside the /blocks directory to your functions.php (or wherever works best for you) inside your theme folder:
/**
 * Load Blocks
 */
function load_blocks() {
	register_block_type( get_template_directory() . '/blocks/hero/block.json' );
}
add_action( 'init', 'load_blocks' );
Building the render template
Let’s start by loading all the fields created with ACF (we’ll create those in a later step) and then add the front-end template below that:
<?php
/**
 * Hero
 */

// Load all fields created with ACF
$data = array(
	'image' => get_field( 'image' ),
  'heading' => get_field( 'heading' ),
  'body' => get_field( 'body' ),
  'link' => get_field( 'link' )
);

<!-- Hero Block -->
<div class="block-hero" id="<?php echo $block['id']; ?>">
  <div class="max-w-7xl mx-auto px-6 py-32 sm:py-40 lg:px-8">
    <div class="grid grid-cols-1 gap-16 items-center md:grid-cols-2 xl:gap-20">
      <div>
        <h2 class="text-3xl font-bold leading-tight sm:text-4xl"><?= $data['heading']; ?></h2>
        <p class="mt-6 text-base leading-7"><?= $data['body']; ?></p>
        <div class="mt-8">
          <a href="<?php echo $data['link']['url']; ?>" class="bg-indigo-500 px-3.5 py-2.5 text-white text-base text-center no-underline font-semibold shadow-sm rounded hover:bg-indigo-300">
            <?php echo $data['link']['title']; ?>
          </a>
        </div>
      </div>
      <img class="w-full h-96 flex-none rounded-2xl object-cover lg:h-auto lg:aspect-[4/3]" src="<?php echo $data['image']['url']; ?>" alt="<?php echo $data['image']['alt']; ?>">
    </div>
  </div>
</div>
I’ve added a very basic layout and design in the example above. Again, if you’re not using Tailwind CSS you’ll have to write your own CSS. But I think the example should be readable enough to give you a basic idea.
I’ve added a very basic layout and design in the example above. Again, if you’re not using Tailwind CSS you’ll have to write your own CSS. But I think the example should be readable enough to give you a basic idea.
Setting up fields with ACF
Now that we’ve set up the code base for our block, it’s time to jump into WordPress admin and add the fields with ACF Pro. Navigate to the ACF settings and click on “Add new field group”. I tend to give my field groups the same name as the block I’ve created, so “hero” in this case.
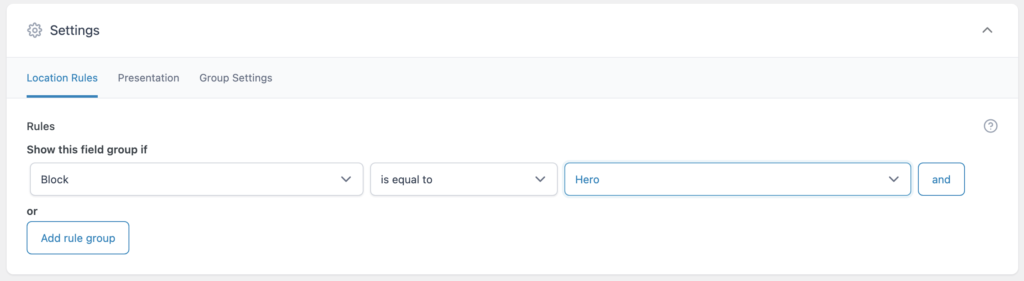
Before you add any fields, scroll down to the bottom and set the rules to show the fields only on your block. If the name of your block doesn’t appear in the list, something might be wrong with your block registration.
Next we’re going to add the fields we defined in our render.php template.

Testing our new ACF block
Time to give it a spin! Create a new page and add our new block. I encourage you to click around for a bit, fill in the fields in the sidebar and see if you can get it to look like this:

And that’s it for now. We’ve already covered enough in this article and I think you should have a good idea now for how to create custom blocks with Advanced Custom Fields. I’ll add more in-depth examples in a future article, looking at how to user InnerBlocks and block supports.